PCSX2 is a popular emulator that lets you play PlayStation 2 games on your PC. Using a PS4 controller with PCSX2 can make your gaming experience better because the DualShock 4 controller is comfortable and familiar to use. The PS4 controller is compatible with various consoles, including the PS3.
This article will show you How to Use PS4 Controller on PCSX2, covering both wired and wireless methods.
Connecting the PS4 Controller
Connecting via USB Cable
Connecting your PS4 controller to PCSX2 using a USB cable is the easiest method. This process is simple and provides a stable connection without needing extra setup.
Plugging the Controller
Insert the micro-USB end of the cable into the PS4 controller and the USB end into an available USB port on your PC.
Verifying the Connection
Once plugged in, the light bar on the PS4 controller should light up, showing that it is powered and connected. If it does not light up, try a different USB port or cable.
Troubleshooting Wired Connection
| Issue | Possible Cause | Solution |
|---|---|---|
| Controller not lighting up | Faulty USB port or cable | Try a different port or cable |
| Not recognized by PCSX2 | Driver issues | Update drivers via Device Manager |
| Intermittent connection | Loose cable connection | Ensure the cable is securely plugged |
Connecting via Bluetooth
Using Bluetooth to connect your PS4 controller offers the convenience of wireless gameplay. This method requires a bit more setup but is still relatively straightforward.
Enable Bluetooth on PC: Ensure Bluetooth is turned on in your PC’s settings. If you’re using a Bluetooth dongle, plug it into an available USB port.
Pairing the PS4 Controller:
Press and hold the Share button and the PlayStation button on the PS4 controller simultaneously for about five seconds.
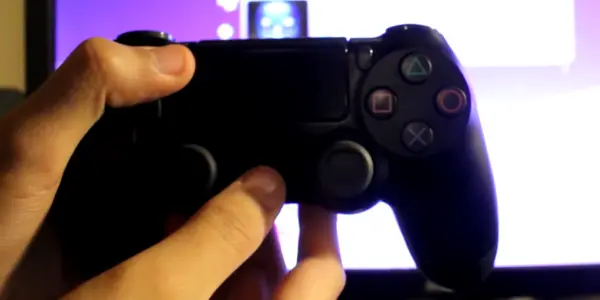
The light bar will start flashing, indicating the controller is in pairing mode.
Adding the Controller in Windows:
Open Bluetooth settings on your PC.
Click on Add Bluetooth or other devices.
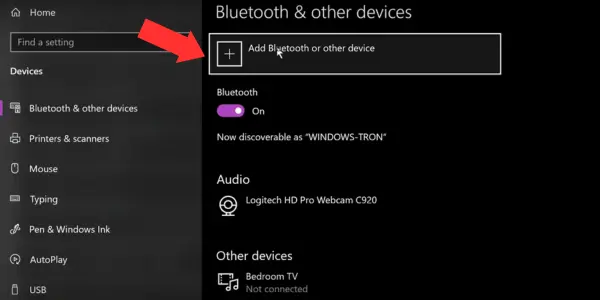
Select Bluetooth and choose Wireless Controller from the list of available devices.
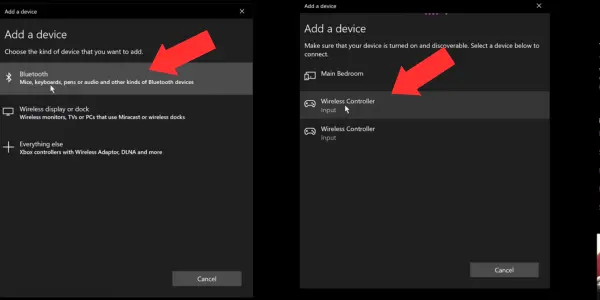
Once connected, the light bar will become solid.
Troubleshooting Wireless Connection
| Issue | Possible Cause | Solution |
|---|---|---|
| Controller not pairing | Not in pairing mode | Press Share + PlayStation buttons |
| Multiple controllers detected | Previous connections | Connect one by one, delete extras |
| Connection drops | Interference or driver issues | Move closer, update drivers |
Configuring the Controller in PCSX2
Setting Up the Controller in PCSX2
Once your PS4 controller is connected, the next step is to configure it within PCSX2. This ensures that all buttons and controls are mapped correctly for optimal gameplay.
Accessing PCSX2 Controller Settings
Open PCSX2: Launch the PCSX2 emulator.
Navigate to Settings: Go to Config > Controllers (PAD) > Plugin Settings and enable DualShock 4, just like shown in the picture.
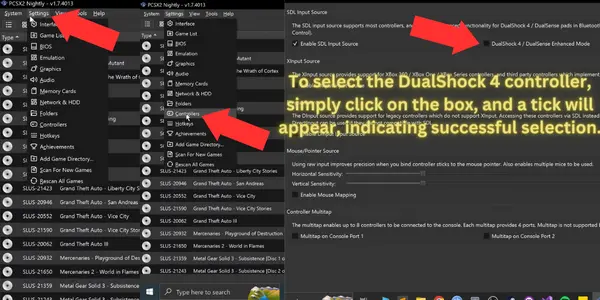
Select Controller Port: Choose Port 1 or Port 2 based on your preference. Typically, Port 1 is used for Player 1.
Enabling DualShock 4 Enhanced Mode
DualShock 4 Settings: In the controller settings menu, enable DualShock 4/DualSense Enhanced Mode. This option enhances the compatibility and features of the PS4 controller.
Customizing LED Color:
Click on LED Light.
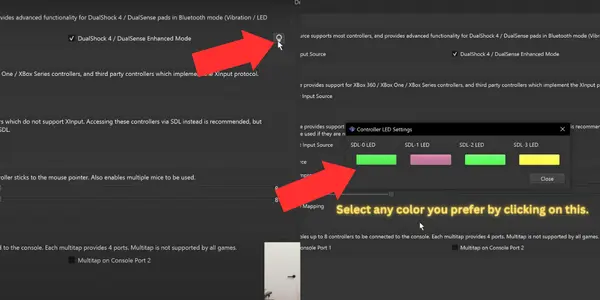
Select your preferred color from the options. The default color is green, but you can choose from various colors like red, blue, or custom shades.
Configuration Options in PCSX2
| Setting | Description | Default Value |
|---|---|---|
| Port | Controller port (1 or 2) | Port 1 |
| DualShock 4 Enhanced Mode | Enhances controller features | Enabled |
| LED Light | Customizable light bar color | Green |
Customizing Controller Mappings
Mapping Buttons and Controls
PCSX2 allows for extensive customization of controller mappings, enabling you to tailor the controls to your liking.
Automatic Mapping
Automatic Mapping: In the controller settings, select Automatic Mapping. This feature automatically assigns default button functions based on standard PS2 controller layouts.
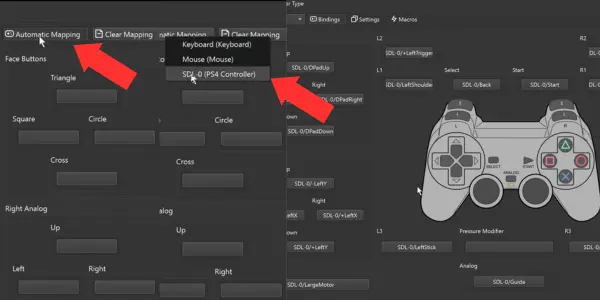
Manual Mapping
Manual Customization: If you prefer custom mappings, you can manually assign each button. Click on the button you wish to configure and press the corresponding button on your PS4 controller.
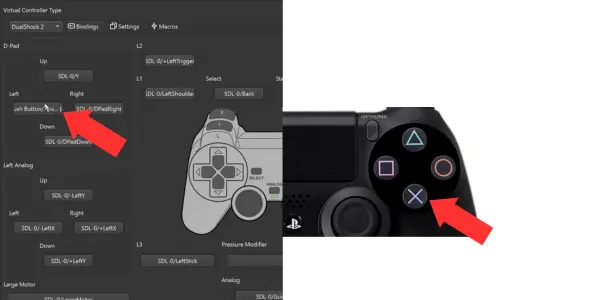
Example: To set the D-Pad, click on D-Pad Up in PCSX2 and then press the Up arrow on your PS4 controller. Repeat this for all directions and buttons.
Table: Example Custom Mappings
| PCSX2 Control | PS4 Controller Button |
|---|---|
| D-Pad Up | Up Arrow |
| D-Pad Down | Down Arrow |
| D-Pad Left | Left Arrow |
| D-Pad Right | Right Arrow |
| X Button | Cross |
| Circle Button | Circle |
| Square Button | Square |
| Triangle Button | Triangle |
| L1 | L1 |
| R1 | R1 |
| L2 | L2 |
| R2 | R2 |
Advanced Settings
| Feature | Description | Default Value |
|---|---|---|
| Enable Vibration | Allows controller haptic feedback | Enabled |
| Invert Axis | Invert X or Y axis for analog sticks | Disabled |
| Sensitivity Adjustment | Fine-tune analog stick sensitivity | 100% |
| Multiple Profiles | Save and load different controller setups | Disabled |
By following this article, you should now have your PS4 controller fully set up and customized for use with PCSX2. Whether you choose a wired or wireless connection, the steps provided ensure a smooth and enjoyable gaming experience.
Dive into your favorite PS2 games with the comfort and precision of a DualShock 4, and enjoy a seamless transition from console to PC gaming. If you run into any issues or have more questions, feel free to comment below. Happy gaming!

