
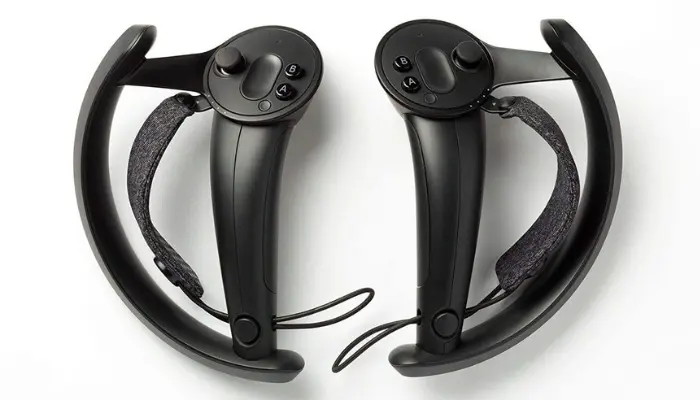
Are you tired of dealing with joystick issues, erratic movements, and unresponsive buttons on your Valve Index controllers? You’re not alone. Many gamers have experienced the frustration of controller drift, which can seriously impact gameplay and overall user experience. In this guide, we’ll explore the ins and outs of Valve Index controller drift, including its causes, symptoms, and most importantly, how to fix it yourself.
Understanding Valve Index Controller Drift
Controller drift refers to the situation where a gaming controller registers movement even when the joystick or thumbstick is not being touched. This can result in unwanted character movements, camera panning, or menu navigation, ultimately disrupting gameplay.
Causes of Controller Drift
Wear and Tear
Over time, the internal components of gaming controllers, including the thumbsticks and sensors, can wear down due to regular use. Friction and repeated movements can lead to the deterioration of critical components, resulting in drift issues.
Build Quality
In some cases, controller drift may be attributed to the design or construction of the controller itself. Inferior materials or manufacturing defects can contribute to premature wear and malfunction.
Environmental Factor
Things like dust, dirt, or water can mess up how a controller works. If stuff like that gets inside, it can mess with the parts inside and make the controller not work right.
Electronic Interference
Electromagnetic interference from other electronic devices or wireless signals can disrupt the communication between the controller and the gaming console or PC, potentially causing drift issues
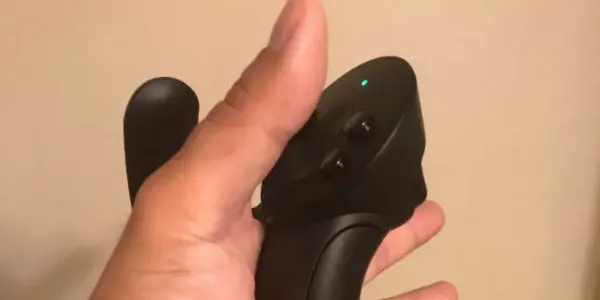
Recognizing Controller Drift
Signs of Drift
Joystick input registering without physical manipulation
Inconsistent movement or response during gameplay
Noticeable deviation from the center position when the joystick is released
Diagnosing Drift
Most gaming platforms offer built-in diagnostic tools that allow users to test controller functionality. These tools can help identify drift issues and determine the extent of the problem.
Importance of Early Detection
Addressing drift issues early is crucial to prevent further damage and ensure optimal controller performance. Ignoring drift symptoms can lead to more severe problems over time.
Testing Procedures
Use controller diagnostic tools provided by gaming platforms to identify drift issues.
Test the controller in various games and scenarios to assess the consistency of drift behavior.
Document any observed drift patterns or irregularities for reference during the repair process.
DIY Controller Repair
Precautions and Disclaimer
Before attempting any DIY repair, it’s essential to understand the risks involved and proceed with caution. DIY repairs may void warranties and carry the risk of damaging the controller further. Proceed at your own risk.
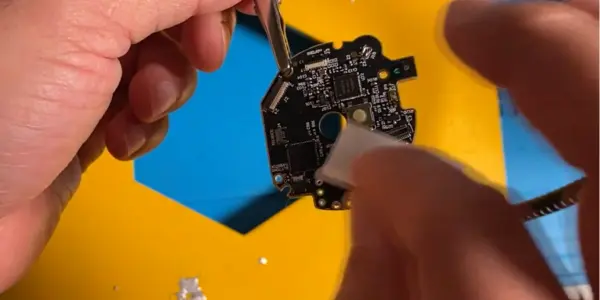
Disassembly Process
Gather necessary tools and materials, including a screwdriver, wedging tool, soldering equipment, and replacement thumbsticks.
Carefully disassemble the controller, starting from the bottom to avoid damaging internal components.
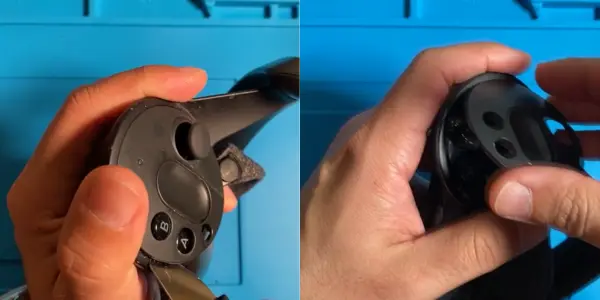
Identify and locate the components responsible for joystick functionality, such as the thumbsticks and sensors.
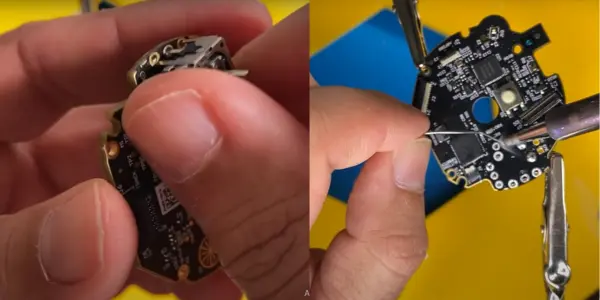
Repairing Thumbsticks
Remove the damaged thumbstick and assess the condition of the components.
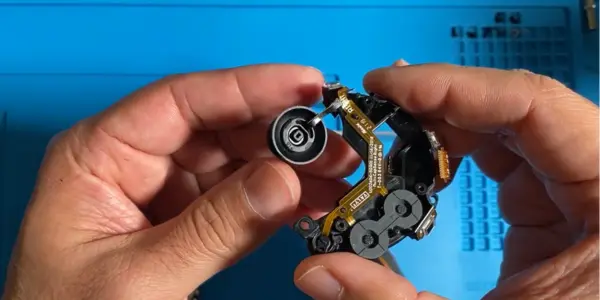
Clean any debris or residue from the controller components using alcohol.
Solder the replacement thumbstick onto the controller board, ensuring proper alignment and connection.
Replacing Sensors
Identify the sensors responsible for joystick movement and calibration.
Remove the faulty sensors using soldering equipment and replace them with compatible replacements.
Calibrate the new sensors according to manufacturer guidelines to ensure accurate joystick functionality.
Reassembly and Testing
Reassemble the controller, following the disassembly process in reverse.
Test the controller’s functionality using built-in diagnostic tools or in-game testing.
Calibrate the controller if necessary to ensure optimal performance post-repair.
Replacement Parts and Where to Find Them
Sourcing Replacement Parts
Replacement thumbsticks, sensors, and other controller components can be found online from various suppliers.
Popular platforms such as AliExpress and eBay offer a wide range of replacement parts for gaming controllers, including those for the Valve Index.
Choosing High-Quality Parts
When selecting replacement parts, prioritize quality and compatibility to ensure optimal performance and longevity. Look for reputable suppliers and read reviews from other users to gauge the reliability of the parts.
OEM vs. Third-Party Parts
Original Equipment Manufacturer (OEM) parts may offer better compatibility and reliability but can be more expensive.
Third-party parts may be more affordable but vary in quality and compatibility. Research and read reviews before purchasing.
Tips for Successful Repair
Best Practices
Take your time and work methodically to avoid damaging delicate components.
Refer to online tutorials or instructional videos for guidance during the repair process.
Test the controller thoroughly before reassembly to identify any issues early on.
Common Pitfalls to Avoid
Applying too much force during disassembly, which can damage components or connectors.
Skipping calibration or testing steps, which can result in incomplete repairs or further issues down the line.
Seeking Professional Assistance
If DIY repair attempts fail or if you’re uncomfortable with soldering and electronics, consider seeking professional assistance from a repair technician or manufacturer-approved service center.
Testing and Calibration
Importance of Testing
Thorough testing is essential to ensure that the repaired controller functions properly and addresses the drift issue effectively. Use diagnostic tools or in-game testing to assess controller functionality.
Calibration Techniques
Follow manufacturer guidelines or online tutorials to calibrate the controller accurately.
Adjust sensitivity settings and dead zones to optimize joystick performance and minimize drift.
Fine-Tuning Settings
Experiment with different calibration settings to find the optimal configuration for your gaming preferences and playstyle. Fine-tuning sensitivity and dead zones can enhance overall gameplay and responsiveness.
Preventative Maintenance and Longevity Tips
Maintenance Strategies
Regularly clean and inspect the controller for debris or damage.
Store the controller in a clean, dry environment to prevent moisture ingress and corrosion.
Avoid excessive force or rough handling, which can accelerate wear and tear on internal components.
Longevity Tips
Invest in protective accessories such as controller covers or cases to prevent physical damage.
Rotate controller usage to distribute wear evenly across multiple controllers, if available.
Stay informed about software updates or firmware patches that may address controller performance issues.
Routine Checkups
Schedule regular maintenance checkups for your gaming controllers to identify and address potential issues before they escalate. Inspect buttons, triggers, and thumbsticks for signs of wear or malfunction.
Conclusion
In conclusion, addressing Valve Index controller drift requires patience, caution, and a willingness to explore DIY repair options. By understanding the causes of drift, following step-by-step repair guides, and practicing preventative maintenance, gamers can extend the lifespan of their controllers and enjoy uninterrupted gameplay. Remember to proceed with caution, prioritize safety, and seek professional assistance if needed. With the right approach, you can conquer controller drift and get back to gaming with confidence.